Interfacing a Pictorus App with an Existing codebase
Pictorus apps can be deployed and run directly as standalone executables on a target device. However, there are times when you may want to interface a Pictorus app with some existing codebase. You can export any Pictorus app as a static or dynamic library with C bindings. This allows you to link and call your Pictorus app from any language that supports C FFI (Foreign Function Interface), including C, C++, Rust, Python, and many others.
Being able to pass data to/from a Pictorus app allows us to handle I/O operations at a high level and offload control logic to Pictorus. Alternatively, you might want to use Pictorus to interface with hardware, and pass those results back to your existing codebase.
Examples
You can see working examples of how to link and call a Pictorus app from C and Rust in this repository: https://github.com/Pictorus-Labs/pictorus_ffi_example
Example application
In this example, we will create a simple Pictorus app that accepts a single value from an external source, multiplies it by a random number, and returns the result back to the caller.
Configure the app to output a library
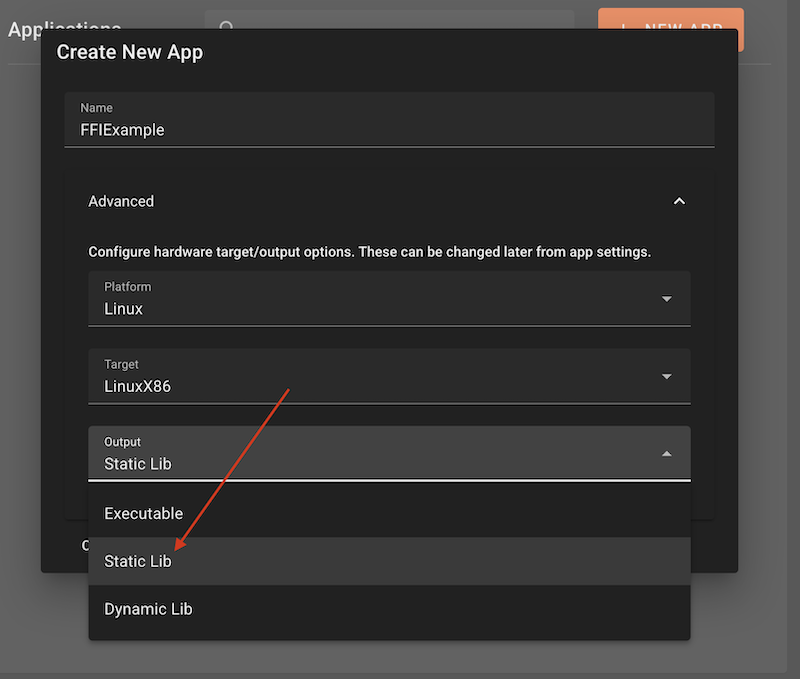
When creating the new app, set the output type to "Static Lib" by opening the "Advanced" tab and clicking on the "Output" dropdown.
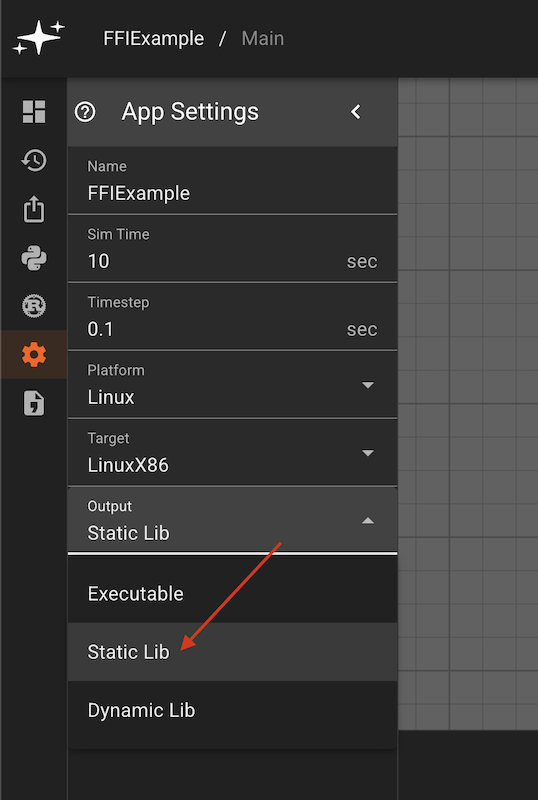
If you have an existing app, you can change the output type by clicking on the "App Settings" tab in the left sidebar, and then clicking the "Output" dropdown.
 .
.
This same process applies to the "Dynamic Lib" output type for supported targets.
Add FFI Inputs and Outputs
Now that our app is configured to output a dynamic library, we will add the required FFI input and output.
- Navigate to the top-level state view of your app by clicking on the app name in the top toolbar.

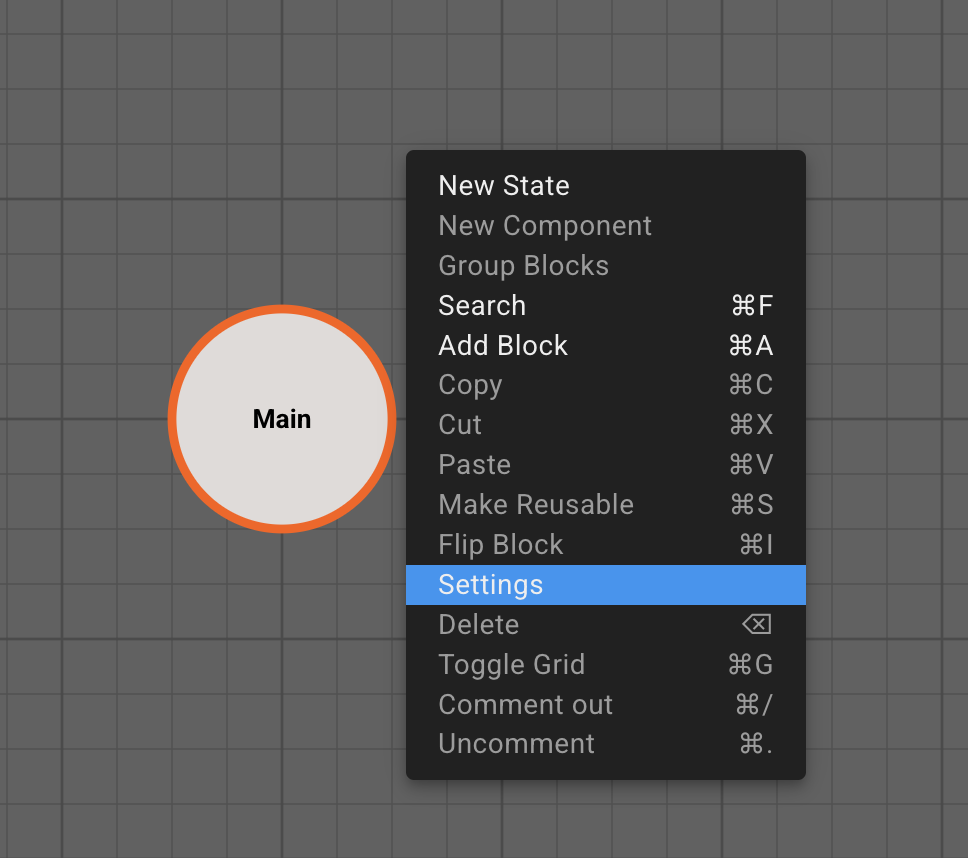
- From the top-level state view, right click anywhere on the canvas and click "Settings".
- You will now see a settings tab that includes options to "Add FFI Input" and "Add FFI Output". In our case, we will add a single FFI input called "input" and a single FFI output called "output". The "Default" value controls what the value will be initialized to when the app starts. In our case we can leave them both as 0.
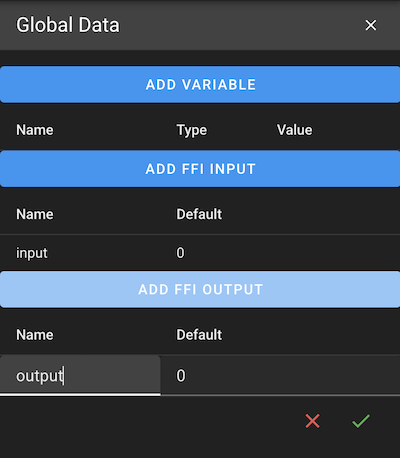
Note: FFI inputs and outputs currently only support scalar values.
Implement an app that reads and writes FFI values
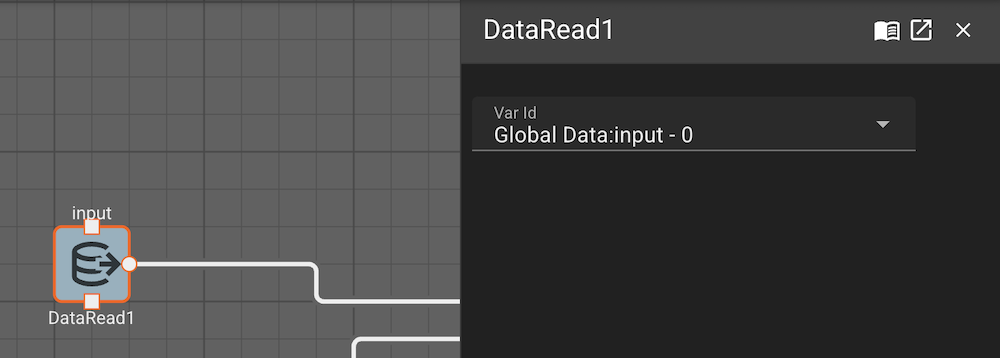
Once FFI values have been configured for your app, they will be exposed to blocks as top-level variables that can be written to and read from using the standard mechanisms for interfacing with variables. In our case we can read the input value using a DataReadBlock.
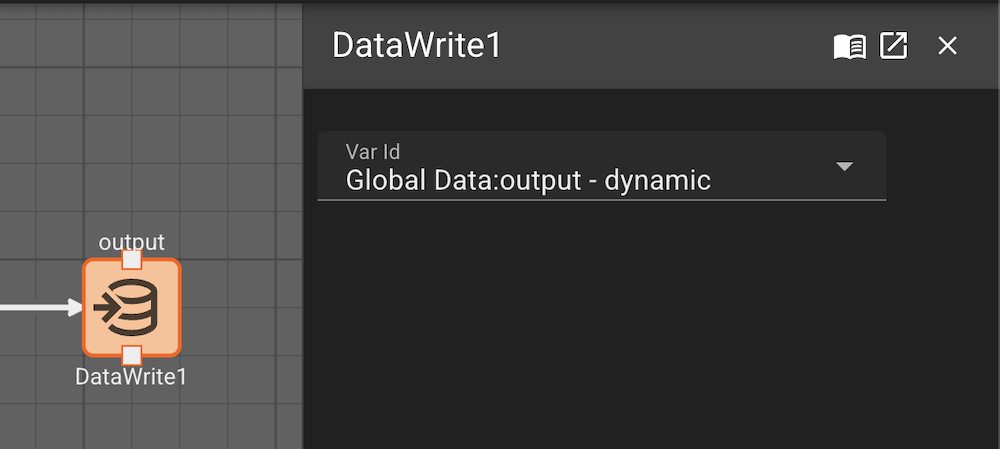
And we can write to the output value result using a DataWriteBlock.
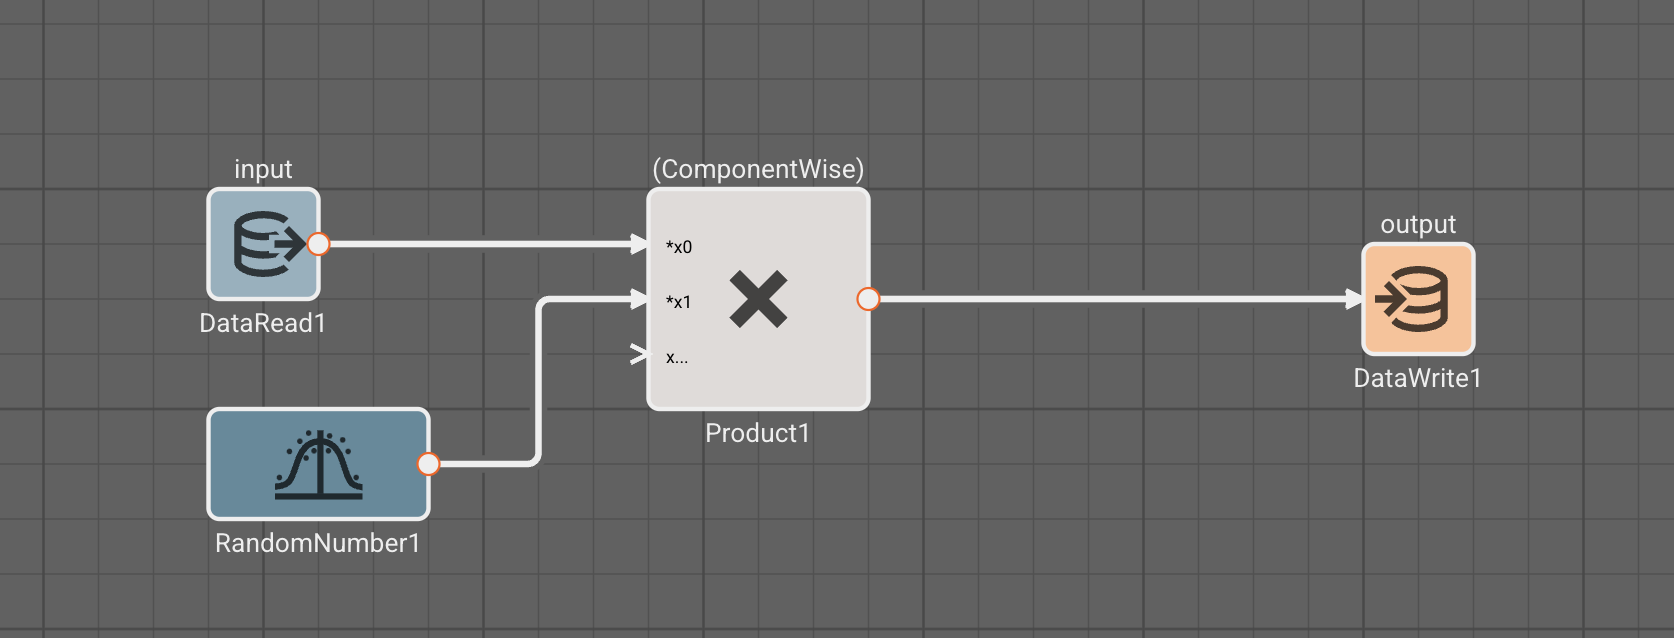
We can implement the remaining logic of our app by adding a RandomNumberBlock, multiplying its output by the input signal originating from the DataReadBlock using a ProductBlock, and feeding the result to the DataWriteBlock connected to the output FFI.
Export the app
Note: Source code exports are only available on paid plans/trials.
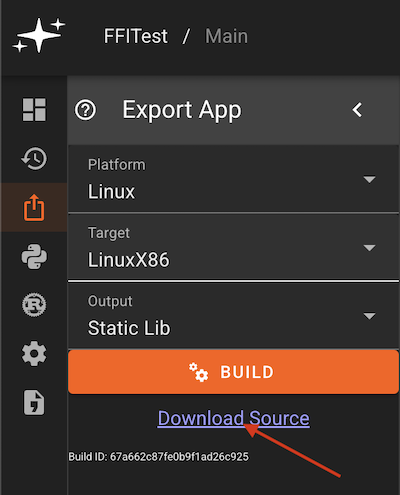
Our app is now complete, and ready to be integrated into our codebase. To export the source code and libraries, navigate to the "Export" tab in the left sidebar. Verify your platform, target, and output are correct, and then click "Build". Once the build has completed, click the "Download Source" button to download the source code and libraries.
The source code will include a C header file that looks like the following:
typedef struct AppInterface AppInterface;
// Data structure containing all inputs
typedef struct AppDataInput {
    double input_ffi;
} AppDataInput;

// Data structure containing all outputs
typedef struct AppDataOutput {
    double output_ffi;
} AppDataOutput;


#ifdef __cplusplus
extern "C" {
#endif // __cplusplus

AppInterface *app_interface_new(void);

void app_interface_free(struct AppInterface *app);

AppDataOutput app_interface_update(struct AppInterface *app, double app_time_s, struct AppDataInput *input_data);

#ifdef __cplusplus
} // extern "C"
#endif // __cplusplus
This header file defines the interface to the Pictorus application. The app_interface_new function creates a new instance of the application, app_interface_free releases the instance, and app_interface_update executes one update cycle. The app_time_s parameter is defined as the time in seconds since the application started. The AppDataInput and AppDataOutput structs define the input and output FFI data respectively.
Calling the library from C
To call the library from C, you will need to include the header file in your C source code, and link against the compiled library. The exported code includes a simple C program for reference. We've modified this program slightly to assign a non-zero value to the FFI input during each time step:
// Builds with the following command from crate root:
// gcc src/example_app.c src/libffi_test_67a51701783b3351e863e36e.a -o example_app -lpthread -Wl,--no-as-needed -ldl -lm
#include <stdio.h>
#include <stdint.h>
#include <inttypes.h>

#include "pictorus.h"


void print_data(double app_time_s, AppDataOutput *data) {
    printf("Time: %f, output_ffi: %f\n", app_time_s, data->output_ffi);
}

int main(void) {
    printf("Starting app\n");

    AppInterface *app_iface = app_interface_new();

    AppDataInput input = {
        .input_ffi= 0.0,
    };

    double timestep_s = 0.1;
    double app_time_s = 0.0;
    double max_time_s = 1.0;

    for(double app_time_s=0.0; app_time_s < max_time_s; app_time_s += timestep_s) {
        input.input_ffi = app_time_s;
        AppDataOutput output = app_interface_update(app_iface, app_time_s, &input);
        print_data(app_time_s, &output);
    }

    app_interface_free(app_iface);

    printf("Done running app");
}
We can compile and run this program using the command referenced in the top of the example file:
# Note the name of the .a file in your downloaded source code, it will be different than the one below
gcc src/example_app.c src/libffi_test_67a51701783b3351e863e36e.a -o example_app -lpthread -Wl,--no-as-needed -ldl -lm
./example_app
This program outputs the following:
Starting app
Time: 0.000000, output_ffi: -0.000000
Time: 0.100000, output_ffi: -0.025728
Time: 0.200000, output_ffi: 0.509879
Time: 0.300000, output_ffi: -0.036878
Time: 0.400000, output_ffi: 0.678048
Time: 0.500000, output_ffi: 0.713464
Time: 0.600000, output_ffi: 0.087214
Time: 0.700000, output_ffi: -0.078597
Time: 0.800000, output_ffi: -0.115386
Time: 0.900000, output_ffi: 0.571152
Time: 1.000000, output_ffi: -0.771117
Calling the library from Rust
To call the app from rust, you will need to include the generated library in your project via a build script, and also create Rust wrapper bindings around the C interface.
To link the header and library files in your build process, add the following to your build.rs file:
#![allow(unused)]
fn main() {
// Tell cargo to look for shared libraries in the specified directory
println!("cargo:rustc-link-search=/path/to/your/library_dir");

// Tell cargo to tell rustc to link the generated library
// The library name will be the same as the .a file with the 'lib' prefix and '.a' suffix removed
println!("cargo:rustc-link-lib=ffi_test_67a51701783b3351e863e36e");
}
You can then create and include the Rust bindings in your project by writing them manually, or by using a tool like bindgen to create them via CLI or automatically generate them as part of the build. Here's an example of what our Rust bindings might look like:
#![allow(unused)]
fn main() {
#[repr(C)]
#[derive(Debug, Copy, Clone)]
pub struct AppInterface {
    _unused: [u8; 0],
}
#[repr(C)]
#[derive(Debug, Copy, Clone)]
pub struct AppDataInput {
    pub input_ffi: f64,
}
#[repr(C)]
#[derive(Debug, Copy, Clone)]
pub struct AppDataOutput {
    pub output_ffi: f64,
}
unsafe extern "C" {
    pub fn app_interface_new() -> *mut AppInterface;
}
unsafe extern "C" {
    pub fn app_interface_free(app: *mut AppInterface);
}
unsafe extern "C" {
    pub fn app_interface_update(
        app: *mut AppInterface,
        app_time_s: f64,
        input_data: *mut AppDataInput,
    ) -> AppDataOutput;
}
}
We can then call the library from Rust using a similar pattern to the C example:
mod bindings;
use bindings::*;

fn print_data(app_time_s: f64, output: &AppDataOutput) {
    println!(
        "app_time_s: {:.1}, output_ffi: {:.3}",
        app_time_s, output.output_ffi
    );
}

fn main() {
    println!("Starting app");
    let app_iface = unsafe { app_interface_new() };
    let mut input = AppDataInput { input_ffi: 0.0 };
    let timestep_s = 0.1;
    let max_time_s = 1.0;

    for app_time_s in (0..(max_time_s / timestep_s) as i32).map(|i| i as f64 * timestep_s) {
        input.input_ffi = app_time_s;
        let input_ptr = &mut input as *mut AppDataInput;
        let output = unsafe { app_interface_update(app_iface, app_time_s, input_ptr) };
        print_data(app_time_s, &output);
    }

    unsafe {
        app_interface_free(app_iface);
    }

    println!("Done running app");
}
The app can then be built and run using cargo run, which outputs the result:
Starting app
app_time_s: 0.0, output_ffi: -0.000
app_time_s: 0.1, output_ffi: -0.026
app_time_s: 0.2, output_ffi: 0.510
app_time_s: 0.3, output_ffi: -0.037
app_time_s: 0.4, output_ffi: 0.678
app_time_s: 0.5, output_ffi: 0.713
app_time_s: 0.6, output_ffi: 0.087
app_time_s: 0.7, output_ffi: -0.079
app_time_s: 0.8, output_ffi: -0.115
app_time_s: 0.9, output_ffi: 0.571
app_time_s: 1.0, output_ffi: -0.771
Done running app
A note on Rust FFI
Ideally we would not need to use the intermediate C FFI in order to call a Pictorus app from Rust. However, at this time Pictorus does not generate a publicly accessible Rust interface that an app can pull in. This is a feature that is planned for a future release.
Calling the library from other languages
A large number of languages support interacting with libraries via a C FFI. If you need to call a Pictorus app from some language other than C/Rust, you can do so by following the relevant C FFI documentation for that language. Generally this will be a similar process of linking against the generated library/header and providing the appropriate bindings.